
Understanding and Solving Headspace Problems in Canning
- Adrienne Dueringer
- Sep 14, 2022
- 6 min read
Updated: Jan 22, 2023

Correct headspace is mandatory when canning for food safety. I fought with this for my first few years of canning. It was a complete mystery because I was following all of the recommended guidelines for each product I packed, but for some reason, when I pulled my jars from the canner, the headspace had changed. If you know you are filling your canning jars correctly and they come out of the pressure cooker with incorrect headspace, here is why.
First off - I need to make a public announcement that pressure canning in any instant cooker is NOT SAFE unless the manual clearly states and comes with instructions on how to pressure can in them. The walls of an instant cooker are not insulated and are not heated evenly enough for pressure cooking. The FDA is working on approval for models, but currently, none are approved.
This is an excerpt from one cooker's website.
"The Instant Pot product line is regulated by a pressure sensor instead of a thermometer; the altitude of your location may affect the actual cooking temperature. We recommend to not use Instant Pot for pressure canning," the website states. Apr 7, 2018
I would not use an instant cooker for water bath canning due to a lack of the ability to verify temperature (it needs to stay boiling for the entire water bath process) and the ability not to overcook the product being processed because it can't be unloaded quickly.

Typically, when we pressure cook, we are taught to heat the canner on high to a rolling boil and to keep it there until we load our jars of product. We quickly seal up the canner on a vigorous boil and eagerly wait for the evacuation process to finish. Ten minutes is recommended. Then we add the weight or set the gauge and wait until it hits its set point. Once it is at the correct pressure, we turn the temperature down to get the canner to stop overreacting and set the timer for the allotted time.
Mistakes have already been made!
Here is the basic understanding of how a pressure canner works from Ohio and Iowa State University Extension. (source links included below.) Understanding the process helps this make sense.
(1) During the canning process, the air is driven from the jar, and a vacuum is formed as the jar cools and seals, preventing microorganisms from entering and recontaminating the food. It does not take long at 212 degrees Fahrenheit, the temperature at which water boils, to force air out, create a vacuum and seal a jar. May 28, 2015
(2) Water can get no hotter than the boiling point (212ºF, 100ºC), but steam can. Steam trapped in the canner increases the atmospheric pressure inside the canner, causing the boiling point of water to increase to 240ºF-250ºF, the temperature needed to destroy bacteria and C. botulinum that would otherwise be free to grow in a vacuum-sealed jar. May 17, 2022
Sealing up your canner with a vengeful boil has the steam quickly heating the slightly cooler jars full of product. This can create a vacuum so fast that it sucks the fluid from your jars before they are sealed, long before the product inside finally reaches the boiling temperature to kill bacteria.
Here is how I do it to maintain food safety and to maintain proper head space without fail.
Notice where you set your stove thermostat to get your canner to run properly during a regular canning session.
Heat your canner to a high boil with the lid offset on top. This heats the walls of the canner and lid properly.
Fill your jars and load them into the boiling canner. The slightly cooler jars will quickly lower the canner temperature to a simmer.
Immediately set your stove to the temperature where it normally cooks correctly and maybe a "pfft" higher. This will keep the pressure cooker from heating too quickly or overheating.
Close the lid and seal it while evacuation takes place.

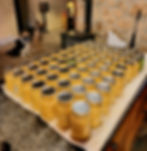
This will extend the cooking time. Relax. Be patient. You will have the correct headspace and food safety. Again, you can see in this photo how I do it. I loaded the canner while it was boiling and turned the stove down to where I knew it would crank out that perfect 10 pounds of pressure for this tomato sauce just as I put the lid on for evacuation. I will not need to adjust the heat for the rest of the process except maybe for a slight tweak due to the different loads of the jars of product from run to run. Everyone's stove is different so take notes on where you set your stove for each pressure canning weight or counterweight used.
I have had a full canner take 25 minutes to evacuate properly and another 20 minutes to reach the proper pressure cooking temperature at the setting on the stove where I know my canner cooks best. Nineteen pints of raw packed corn take a long time to get the slightly cooler jars up to a temperature to vacuum seal properly. I would be devastated to ruin a batch of corn this big by rushing the canner and having it siphon that delicious corn broth out that I use for winter chowder.
Now you get the idea of how heating the canner so quickly can create a siphon on the cooler temperatures inside the jar.
*On a side note, canning corn at too high of a temperature that you may hit during the evacuation process can also caramelize the sugars in sweet corn, turning it brown. You don't want to have that pressure dial twerking like a music video while you are pressure cooking, either. It is supposed to be a slow relaxing hula dance at the very most!
In addition to the initial heating process, the cooling process is also essential. Here is another excerpt from Ohio State University Extension.
(3) When the timed process is completed, turn off the heat, remove the canner from the heat if possible and let the canner depressurize. Do not force-cool the canner. Forced cooling will cause liquid loss from the jars and may result in food spoilage. Forced cooling may warp the canner lid and cause seal failure. Depressurization of older canner models should be timed. Standard-size, heavy-walled canners require about 30 minutes when loaded with pints and 45 minutes when loaded with quarts. Newer thin-walled canners cool more rapidly and are equipped with vent/cover locks. These canners are depressurized when their vent lock piston drops to a normal position.
If you are pulling the lid off your canner or tweaking the pressure gauge to let the steam out quickly so you can open it, you could be pulling that dreaded siphon on your jars. I know it is hard not to do in a marathon canning session when you have been in the kitchen for 12 hours. Use that time to rest or catch up on housework. Let the canner cool naturally. I do occasionally cheat and use a small house fan to gently move room-temperature air around the canner when it is finished, which can take off about ten minutes of cooling time. I only do this when I have a full canner because I know it will take forever for 19 pints to cool enough to release the vacuum.

A little extra cook and cooling time will not hurt your canning process. There may be some slight nutrient degradation from a longer cook time, but most of us put the finished canned goods we use for recipes on the stove and cook them longer anyway. I get a kick out of simmering soup or chowder on the wood stove all evening, so I don't worry about the extra time in the canner. It assures my headspace will be correct, so my product doesn't turn brown or spoil on the pantry shelf. I didn't work this hard to grow it to lose product in the last step.
Please share this with your like-minded home canning community friends and on your social media. We can all benefit from more food fresh garden food in the pantry.

Feeling lost and broken? Find inspiration and hope in 'Growing Back to the Land,' the powerful story of one person's journey back to nature and self-sufficiency. Discover the healing power of homesteading and the joys of living off the commercial food grid. Returning to natural ways is the ultimate act of freedom and care for oneself and the environment. Available HERE in paperback and Kindle on Amazon.
Chapter-by-chapter photos and other homesteading information about how we survive independent of the food chain is free on my website: no ads, no pop-ups, no information pirating, and no required sign-in. Sign up if you would like notifications of new blog posts! growingbacktotheland.com
Follow 'Growing Back to the Land' or author Adrienne Dueringer on your Google News App. Like and follow on Facebook, Twitter, Tik-Toc, Pinterest, and Instagram for up-to-date homesteading posts.
(2) https://blogs.extension.iastate.edu/answerline/2022/05/17/remember-to-vent/#:~:text=Water%20can%20get%20no%20hotter,to%20destroy%20bacteria%20and%20C.
(3) https://ohioline.osu.edu/factsheet/HYG-5338#:~:text=During%20the%20canning%20process%2C%20air,vacuum%20and%20seal%20a%20jar.